My Free HDTV with DVR Setup
For the last 9 years I have been cable free and using OTA (over-the-air) HDTV in conjunction with a free DVR solution. I originally decided to go this route because I thought it would be a fun process to get everything setup but also because I wanted to save money. If the average cable bill is $80 a month, I have saved almost $9,000 over the last 9 years ($80 x 12 months x 9 years = $8640). That’s a lot of money folks.
Not only does OTA HDTV save lots of money, I would argue that the quality is the best quality picture you can get for television. When I compare my picture to a friend’s cable or satellite picture I think mine is superior, easily. Another compelling reason to go this route today is that more and more quality content is available over streaming services like Netflix, Hulu and Vudu so you don’t have to have cable so you can watch that must-see show. And for the sports fanatic that can’t live without ESPN, you can now get Sling TV to scratch your itch of live sporting events without cable.
I’ve had a handful of friends ask over the years what my setup is so I thought I would document it here. It has changed over the 9 years but I feel my current setup is the best and the one I can recommend.
The Antenna
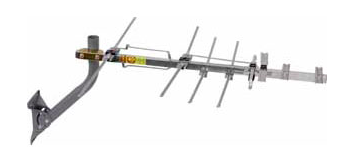
Audiovox RCA ANT751
First of all, you need to get a good antenna. This is a foundational piece and you’ll want to make sure you get a good antenna and pointed at the best direction. There are lots of options here: from bunny ears, slimline wall mounts, discreet table-top, directional, omnidirectional, indoor, outdoor, etc. Lot’s of options! The are many factors to consider for an antenna such as directional displacement of your house from the TV stations, obstacles like trees and signal strength. I’ve tried about 5 different options over the years and will hands down recommend an outdoor (or attic) directional antenna. If you are serious about an OTA setup, I say go with an outdoor directional antenna because it gives a great stable picture and you won’t have to worry about constantly adjusting it to tune in a station. The one I have is the Audiovox RCA ANT751 from Fry’s. It’s $79 and well worth it.
This is how my mounted antenna looks:
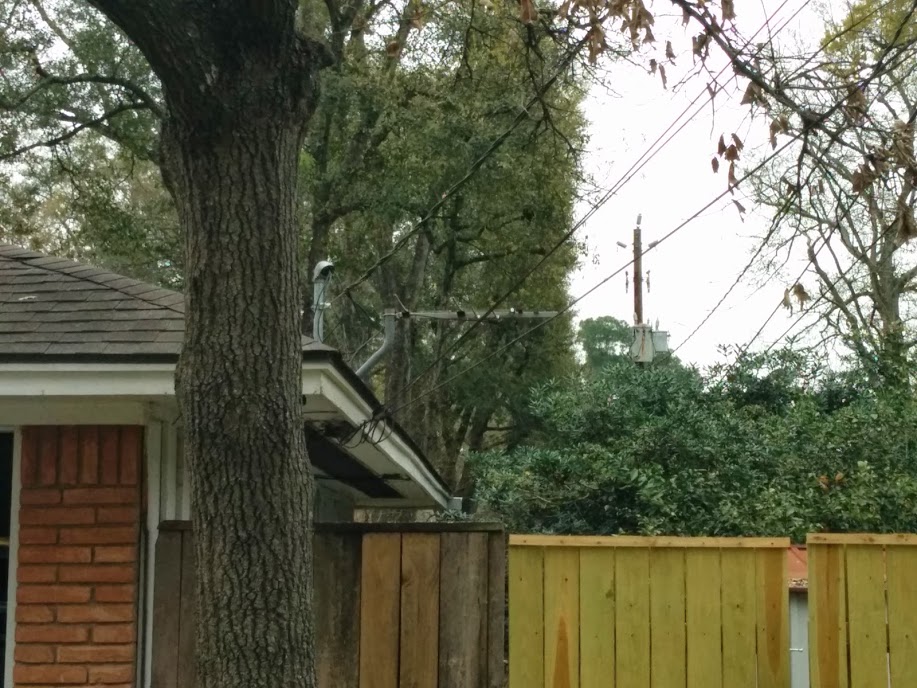
It’s pretty discreet, especially when mounted near other wires and such coming into my house from the utility poles. It’s less discreet than my multi-colored gate anyway.
Once you have your antenna, you need to mount it and point it in the right direction. A great resource for determining which direction to mount it is a website called AntennaWeb – http://www.antennaweb.org. You simply type in your address and it will give you a map of all the TV station signals in your area and the compass degrees of each. My map looks like this:

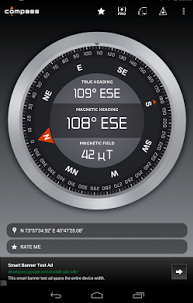
Compass App on Google Play Store
As you can see, most of the stations are between 195° and 196° degrees. This is where I need to point my antenna. Grab your smart-phone and get a compass app from your app store. In my case, I use Android so I downloaded “Compass” from the Play Store. It’s a simple app and will do the job of helping us point in the right direction.
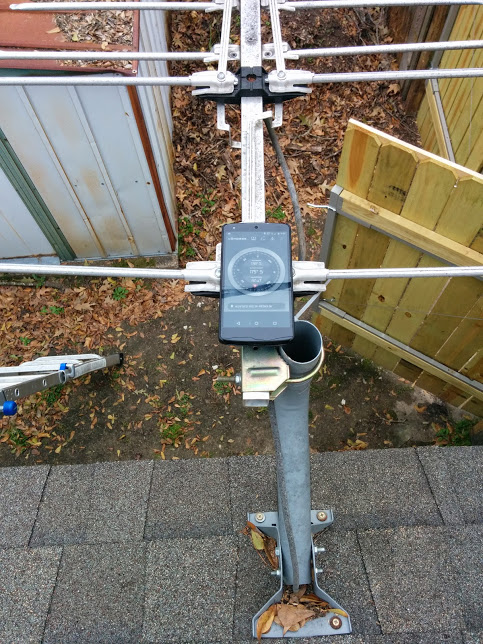
When I mounted my antenna, I took my phone up with me, calibrated the compass and then placed it right on top of the antenna. I was then easily able to rotate it left/right until the compass degree marking matched exactly what I wanted. Then, I tightened the clamps and was good to go!
Obviously, there is a bit more work to do, such as running the coaxial cable to your TV. I like this kind of stuff and if you do too, it shouldn’t be too hard to tackle. However, if you don’t feel that mounting the antenna is something you can do, just pay someone else to do it. It shouldn’t be that expensive.
The DVR
Free OTA HDTV is great but the year is 2015 and a DVR is required, my friends. Not being able to record or pause live TV would be a deal breaker and would fail the WAF (wife-approval-factor).
Again, just as there are many antenna options, there are many DVR options. The cadillac, best-of-breed option here is the TiVO Roamio which costs about $200, depending on the version. It’s got a very nice user interface and works well, but unfortunately it required a monthly subscription fee. It will cost between $12 and $15 a month unless you shell out a whopping $500 for a lifetime subscription. Sorry, that’s a deal breaker for me.
My initial setup was a Windows Media Center PC. This is a special version of Windows that can receive HDTV signals through one or more TV tuner expansion TV cards. It has a slick user interface and can do all the things you would expect for a DVR to do (and much more!). Best of all, there is no monthly subscription charge. Windows Media Center was my solution for the last 8 years and it worked well, I must say. However, there is quite an investment in getting it setup. Not only do you have to purchase a full-blown computer and licensed copy of Windows, you have to buy and install one or more TV tuner cards. There is lots of tweaking of settings to get it just right. And then there is the video/audio connection to your TV you have to work out. Most video cards these days will support a HDMI out connection to your TV but many will not support a high quality, 5.1 digital audio stream through the same cable. At least not in my experience. I was able to get mine working (video out over HDMI, audio out through a optical cable from expansion 5.1 sound card) but let me tell you it was a lot of work and required babysitting over the years. It was this part of my setup that made me hesitate when recommending it to friends. I know this was the biggest obstacle to adoption.
However, there is a new option out there which I’ve been using for the last 6 months. It’s called the Channel Master DVR+. It’s a very small block box that is as simple as it is nice to look at. Just look at it:

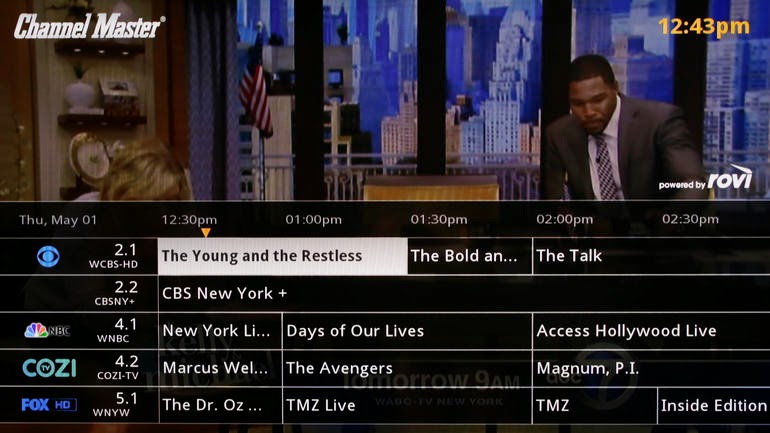
It’s nice to look at and will look great next to your HDTV.
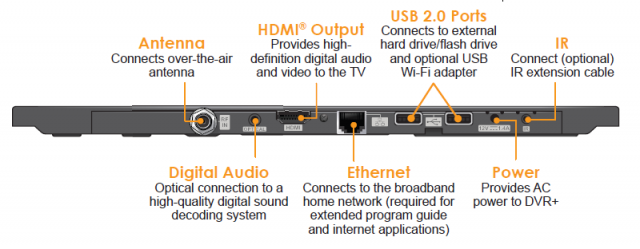
You place it next to your TV, plug in the AC adaptor, hook your coaxial cable from your antenna in the back, connect it to your TV with an HDMI cable, connect to your router via ethernet or wifi adapter, and attach an external USB hard-drive. That sounds like a lot but it’s very simple to setup.
It costs $249 and you need to purchase an external USB hard-drive to hook up to it which will set you back another $60. Beyond this initial cost, there is no monthly subscription fee! It’s simple to setup, simple to use, fairly cheap (all things considered), and has no monthly cost. This is the solution I’ve been waiting for.
My one non-deal-breaker beef with it is the remote control. It’s thin and feels flimsy. It’s not a deal breaker but just feels cheap in my hand.
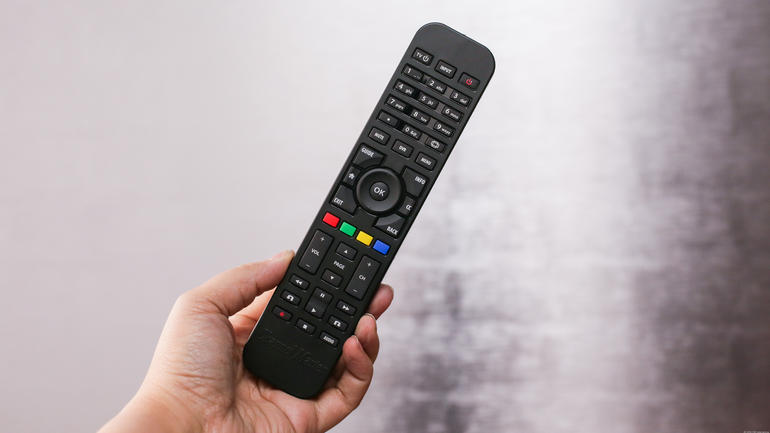
This picture paints it in a nice light but trust me, it’s not the best. I’ve even considered buying a programmable remote to replace it with but again, it’s not a deal breaker.
Rather than exhaustively reviewing the Channel Master DVR+ here, I’ll point you to some great reviews elsewhere that some fine folks spent a lot of time on:
- Subscription-free, no-frills DVR for over-the-air TV (CNET)
- Channel Master DVR+ Review (Digital Trends)
- Channel Master DVR+ (Engadget)
- Amazon Reviews
I should point out that some of the reviews mention the inability to record only “new” episodes rather than all episodes of a show. They have released a software update in the last couple of months that enables this which works great!
Conclusion
There you have it. That’s my free HDTV with DVR setup. There is a bit of an upfront investment in time and cost with getting a good antenna installed and purchasing the DVR but I feel the payoff is huge. Remember how I estimate I’ve saved almost $9,000 over the last 9 years?
This setup will allow you to watch over-the-air television, of which there are some great shows out there. If you have cable, it’s probably hard to remember life before it but I can tell you that the major networks still produce some fine shows; enough to keep you entertained. And after that, you can load up Netflix, Hulu, Vudu, Google Play Store, iTunes, etc. (etc.!) to be entertained even more.
I hope you’ll give free OTA HDTV a try because I don’t think you will be disappointed.